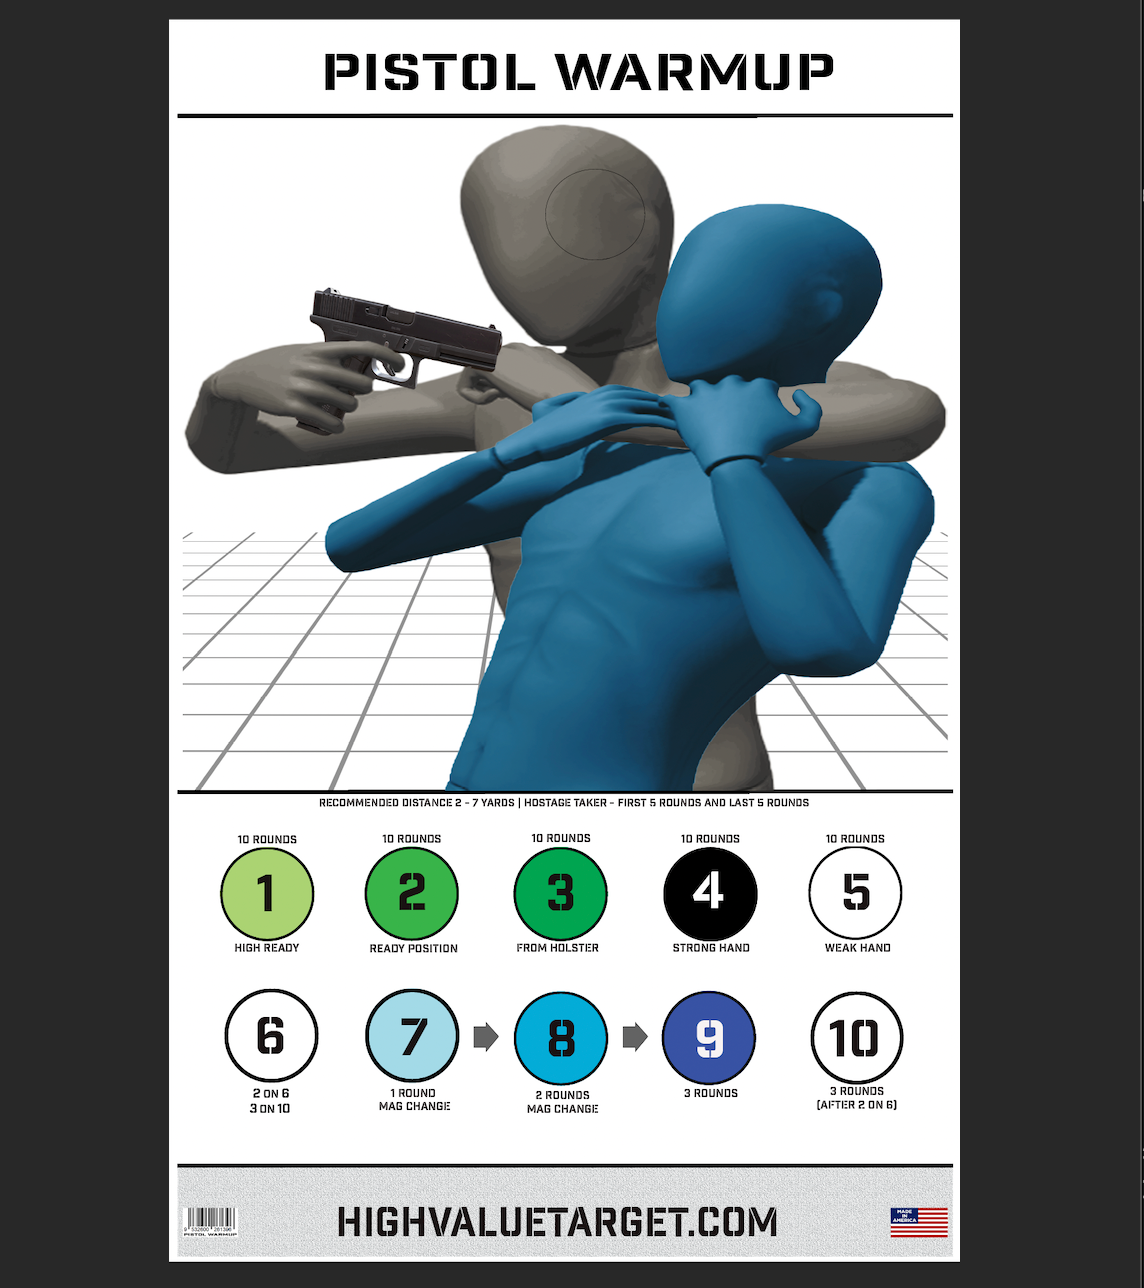
Target - Pistol Warmup
Difficulty - Novice 🟦
Firearm - pistol
Distance - 3 yards (9 feet)
Ammo - 110 rounds
Gear - holster (optional) 3 magazines, double magazine pouch.
Learning Objectives:
1) Confidence to make Hostage Scenario shot.
2) Accuracy and fundamental marksmanship
3) Proficiency from Ready Position
3) Proficiency from the holster
4) Primary hand proficiency shooting
5) Off- hand proficiency shooting
6) Magazine Change proficiency
7) Image Processing
Purpose - 1) instill shooter confidence in taking a hostage shot cold, before any other shots are fired. 2) Increase proficiency in fundamental pistol skills.
Goal - keep all shots fired within the circles.
Prior recommended training - the techniques and methods related to safely drawing a loaded firearm from the holster of the type you will be working from. *Most indoor ranges require clients to demonstrate safely drawing from the holster.
* Safety - prior education and training in methods of safely drawing from the holster actually being used is strongly recommended. Also, prior education and training in methods of safely changing magazines with the type of pistol actually being used is strongly recommended.
Lock & Load, make ready.
Begin from the High Ready position. Fire your first 5 rounds slowly and before warming up, this is intended to give you the confidence to make this shot for real if the situation demands it. Fire the first 5 rounds into the Threat Elimination Zone™ which is faintly depicted over the cerebellum of the brain.
Penetrating this location results in a "no-twitch response and the body will immediately fall. Fire each round with the seriousness and focus that you would if the hostage situation were real. Shoot slowly, rest and relax between each round fired if desired. [5]

Shooting positions utilized during these shooting drills are, from the Holster, the Ready, the High Ready and the SUL positions.
1) 🟢Circle 1- Fire 10 rounds slowly from the High Ready position. Shoot as fast as you can while keeping all rounds within the 2.5-inch circles. [10]
2) 🟢 Circle 2 - Fire the next 10 rounds from the Ready position. Present out from the Ready Position to the High Ready position and fire one round into circle 2. The goal is to have a sight-picture and press the trigger at the moment the arms reach a comfortable extension.
Maintain sight picture for a moment after firing. Repeat 10 times. [10]
*When the pistol returns to the Ready position the trigger finger returns to the slide of the pistol (as depicted).
3) 🟢 Circle 3 - From the holster, the SUL or continue from the Ready position. Fire 10 rounds one round at a time. Maintain sight-picture for a moment after firing. Slow is smooth, smooth is fast. [10]
Safety: The 3 Do's of working from a holster
- a) While removing the gun from the holster the trigger finger remains long & straight and falls along the slide or cylinder of the weapon.
- b) The trigger finger moves to the trigger only after it is safe to fire and the shooter has acquired a sight picture.
- c) After firing the trigger finger moves back to long & straight along the slide or cylinder. Ensure the trigger finger does not remain in contact with the trigger while re-holstering.

4) ⚫️Circle 4- Strong hand only. From the holster, the SUL or continue from the Ready position. Begin by slowly drawing from the holster, leave the support hand on your chest as you continue to present out to High Ready position. Fire one round at a time as fast as possible while keeping all rounds fired within the 2.5 inch circle. [10]
5) ⚪️Circle 5 - Off hand only. With the primary shooting hand extended and with the weapon pointed down range, perform a hand transfer from the primary hand to the off hand. Retract the strong hand back to the chest and maintain contact with the chest while shooting. Ensure the trigger finger remains long & straight until you have a sight picture and have decided to shoot. Fire one round at a time as accurately as possible, keep all rounds within the 2.5 inch circle. [10]
6) ⚪️Circle 6 and ⚪️Circle 10 - Starting position may be from the Holster, the SUL or from the Ready position, shooters choice.
Fire 2 rounds on circle 6 then, fire 3 rounds on circle 10 as quickly and accurately as possible; 6 rounds total each iteration. Reload after each iteration to ensure you have at least 6 rounds remaining. Keep all rounds within the 2. 5 inch circles. Repeat 5 times [30]
🔵 Circles 7, 8 & 9 The purpose of this drill is develop and maintain proficiency at changing magazines as quickly as possible. The shooter needs 3 magazines - number the magazines 1, 2 & 3. Insert 3 rounds into magazine 3. Insert 2 rounds into magazine 2. Insert one round into magazine 1. Lock and Load the magazine with 1 round.
Starting position may be from the Holster, the SUL or the Ready position, shooters choice.
(7) Fire one round into circle 7 (slide lock)
Change magazines as quickly and efficiently as possible.
(8) Fire 2 rounds into circle 8 (slide lock)
Change magazines as quickly and efficiently as possible.
(9) Fire 3 rounds into circle 9 (slide lock, end iteration, reload and reset magazines with the prescribed number of rounds. 6 rounds are fired each iteration. Repeat the drill 5X [30]
*Last but not least, fire 5 more rounds into the hostage taker. Assess shot placement in comparison with earlier rounds fired. There is a faintly depicted zone on the head of the hostage taker. The Threat Elimination Zone is approximately the size of a fist. There are two places to shoot a human, the heart and the cerebellum of the brain.
End Training
Clear and make safe
Total round count - 110


Leave a comment
This site is protected by hCaptcha and the hCaptcha Privacy Policy and Terms of Service apply.